
Ice Bath Parts
Back to Ice Bath
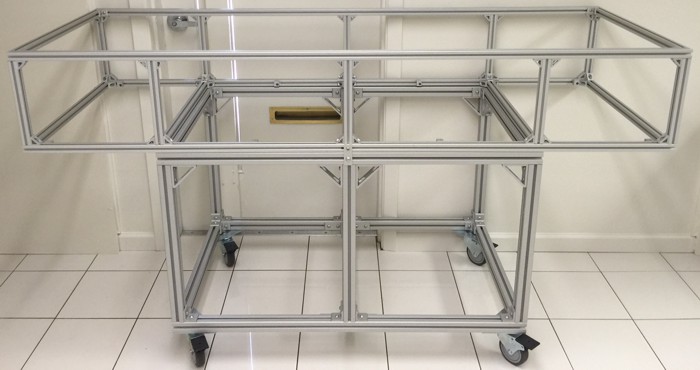
This page describes in detail how to build the main upper portion of this ice bath without legs or wheels.
Initially, this will allow any other cryonics organization to build one. Once this page is complete enough, it will allow outsourcing of the construction so that anyone can essentially order an ice bath already assembled.
Built from 1" extruded aluminum from www.8020.net.
Dimensions:
25” wide inside, 27 (686) outside
11” high inside, 12” (305) outside
73” long inside, 75” (1905) outside
Main Assembly
This part list is only for the main assembly. Parts for subsequent steps are listed separately.
| Part No. | Qty | Length | Unit $ | Appx $ | Description |
| 25-2525 | 4 | 1905 mm | .0084 | $64.00 | T-Slotted Profile, Lite, Smooth |
| 25-2525 | 7 | 636 mm | .0084 | $37.00 | |
| 25-2525 | 10 | 255 mm | .0084 | $21.42 | |
| 25-7005 | 21 | 1.95 | $41.00 | Cut to length | |
| 17-6310 | 132 | 0.26 | $34.32 | Button Head (BHSCS), stainless, M6 10mm | |
| 14124 | 132 | 0.25 | $33.00 | Slide-In Economy T-Nuts | |
| 25-4119 | 10 | 2.90 |
$29.00 | 2 Hole Inside Corner Bracket | |
| 25-4132 | 56 | 3.95 | $221.20 | 2 Hole Inside Gusset Corner Bracket | |
| $480.94 | Total |
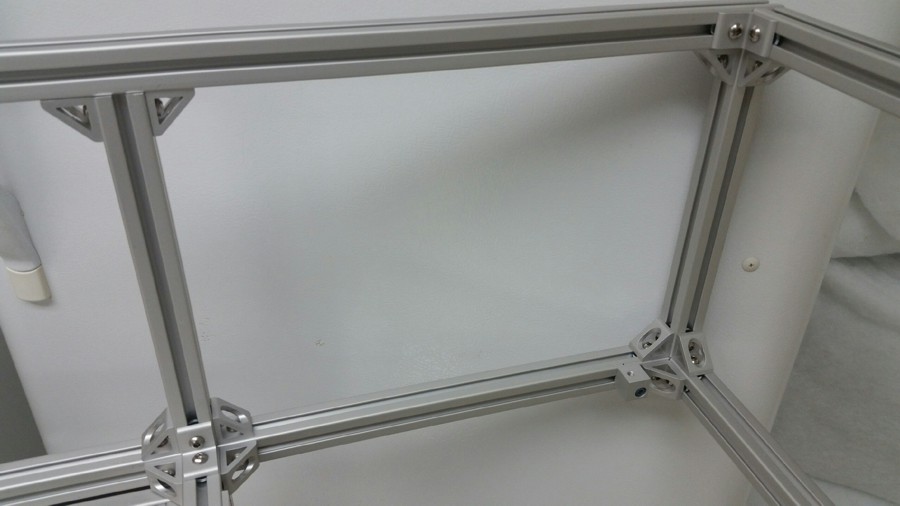
Each of the 4 corner posts requires:
1 corner bracket
5 corner gussets
Each of the 6 side posts requires:
1 corner bracket
6 corner gussets
Each of the above corner brackets and gussets requires two bolts and two nuts. The first step is to load all the bolts and nuts onto the brackets.
Then, loosely begin assembly, only tightening an occasional bolt enough to keep it from falling apart. The parts all slide together, and it will frequently be necessary to slide in such a way as to partially disassemble in order to get the next piece on. There are many different ways it can go together, but it should never be necessary to actually unscrew a bolt completely from its nut, although this is allowed.
Once it's all together, start tightening all the bolts. Just gently tighten a few at each joint until alignment is all verified. Continue with gentle tightening. Finally, after all the bolts are snug, go around once more to do a final aggressive tightening of each bolt.
Baseplate Panel
Part list for this step
| Part No. | Qty | Length | Unit $ | Appx $ | Description |
| 25-1966 | 8 | 1.75 | $14.00 | Roll-In T-Nuts with Flex Handle, Bright, M6 | |
| 65-2650 | 2 | 100.00 | $200.00 | 6mm Alucobest panels | |
| hardware store | 8 | 0.50 | $4.00 | M6 12mm Flat head socket cap screws |
The overall baseplate size is 1905mm x 686mm. However, this is too large to slide in from the end, so instead use two panels of size 952mm x 686mm. Cut out notches in the panel around each of the 10 posts with a jigsaw to accomodate all the gussets. For now, this is a manual process, but we might eventually be able to create digital specifications for automatic cutting of the panel on a CNC machine. This has not been done yet. File to eliminate sharp edges.
Measure for the locations of the four flat head screws to attach each panel. Holes and countersink flanges must be drilled in the panels. This is not easy to do with a drill press, as it tends to jitter and catch. A manual drill run at very slow speed works best --more of a gentle carving action. 80/20 does offer drilling and countersink services, so one option is to eventually outsource this to them.
Alter each of the roll-in T-nuts by cutting off the rubber handles. Otherwise, they will get caught under the panel and will make it more difficult to line up the holes. The rubber nub on the underside of each nut will keep the nut perfectly positioned for assembly.
Liner
18 oz vinyl was used in a previous icebath. This is a good material and can be used again. Other possible membranes include those available at marine stores, rolls of shower liner material with the print scrubbed off, rolls of vinyl roofing membrane, etc. It should be fairly easy to fold the membrane, wrap it across the top rails, and punch holes in it along the outside, through which bolts with washers can be run into T-nuts. In a pinch, the liner can be clamped in place rather than bolted.